How to Draw Comics for Beginners: A Complete 2026 Guide
You probably have a comic idea already.
Maybe it's a fight scene, a funny conversation, a memoir moment, or a whole fantasy world that has lived in your head for years. The problem isn't the idea. The problem is that the second you try to draw it, the gap between what you imagine and what lands on the page feels huge.
That gap stops a lot of beginners. You open a sketchbook, draw one face, hate it, and decide you need more anatomy practice before you're “allowed” to make a comic. Then you practice hands, heads, perspective, and poses for weeks, but still don't have a finished story.
That's why this guide takes a different route. If you're learning how to draw comics for beginners, the fastest path isn't waiting until your art feels perfect. It's making a short comic now, finishing it, and letting the process teach you what isolated drills can't.
Start by Finishing Not by Perfecting
A beginner usually says, “I need to get good at drawing before I make comics.”
A working cartoonist usually says, “I got better because I kept making comics.”
Those are very different mindsets. One keeps you studying forever. The other gets pages done.
Experienced creators in a discussion about comic practice put it bluntly. The fastest method to improve is making short comics, and they describe that as the “#1 rule” for webcomic success. The same discussion also points to thumbnailing many variations to find the right vibe, which means progress comes from repeated drafts, not from waiting for a flawless first try. You can read that advice in this comic practice discussion for beginners.
Practical rule: Your first comic is not a test of talent. It's training.
Think about two beginners.
The first spends a month drawing character portraits. The second draws one rough three-page comic with awkward hands, stiff poses, and uneven panel borders. The second beginner learns scriptwriting, pacing, staging, speech balloon placement, page flow, and how much work a finished page takes. Even if the drawings are weaker, the learning is deeper because it connects to storytelling.
Why unfinished practice feels safe
Endless study feels productive because you can always say you're “preparing.” But preparation can turn into avoidance.
Comics ask you to solve several problems at once:
- Story problem: What happens next?
- Page problem: How many panels does this moment need?
- Drawing problem: What does the room look like?
- Clarity problem: Will the reader understand where to look?
A sketchbook full of random studies doesn't force you to solve those together. A comic does.
A better goal for your first month
Don't aim to “draw like a pro.” Aim to ship a tiny complete story.
That can mean:
- A simple joke comic
- A short conversation between two characters
- A five-page action scene
- A one-page diary comic
If a rough comic teaches you how to finish, it has already done its job.
When beginners ask how to draw comics for beginners, I usually tell them to stop treating comics as a reward for becoming good at drawing. Comics are the thing that will make you better. The page is your classroom.
Your Comic Creation Toolkit
Tools matter, but not as much as beginners think. A simple setup you'll use beats an expensive setup that intimidates you.
Pick the path that removes the most friction. If you love the feel of paper, use paper. If you want easy edits, layers, and digital lettering, go digital. You're not choosing your identity forever. You're choosing your starting lane.
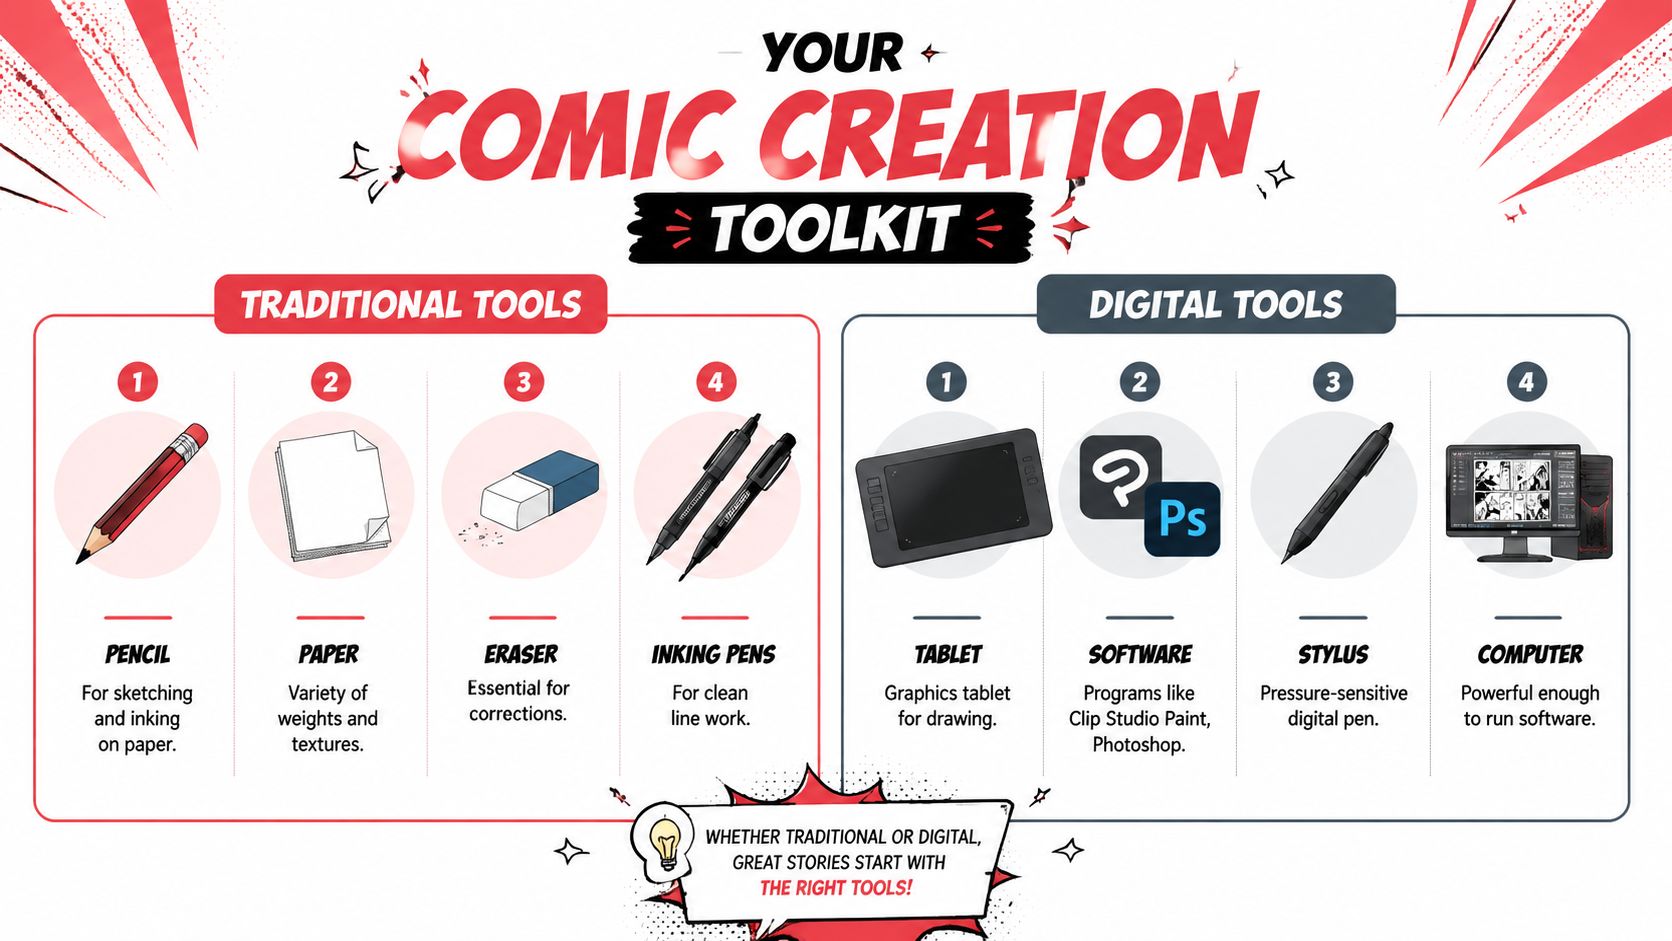
Traditional tools
Traditional comics are straightforward. You need paper, a pencil, an eraser, and something to ink with.
That setup teaches commitment. You can't resize a panel with a click, so you learn to think before you place lines. Many beginners also find paper less distracting because there are fewer menus and settings.
Good traditional basics include:
- Pencil: For loose construction, notes, and page layout
- Paper: Any smooth drawing paper that handles erasing well
- Eraser: A clean eraser matters more than people think
- Inking pens: Useful when you want crisp final lines
Digital tools
Digital drawing gives you speed and flexibility. You can move panels, resize characters, use layers for lettering, and keep colors consistent more easily.
A beginner-friendly digital setup usually includes a tablet, stylus, computer or iPad, and software such as Clip Studio Paint or Photoshop. If you already own a tablet, that's often enough to begin.
| Aspect | Traditional (Pen & Paper) | Digital (Tablet & Software) |
|---|---|---|
| Startup cost | Can be simple and low if you already have supplies | Can be higher if you need hardware and software |
| Editing | Harder to revise once ink is down | Easy to undo, transform, and rearrange |
| Learning feel | Teaches deliberate mark-making | Teaches flexible workflow and production habits |
| Portability | Sketchbook-friendly and easy to grab | Depends on device size and battery |
| Lettering | Usually slower and less forgiving by hand | Much easier to place and revise |
| Color work | Requires separate materials and cleanup | Built for layers, flats, and adjustments |
Which one should you choose
Use traditional if you want a tactile process and fewer technical distractions.
Use digital if you want fast revisions and a smoother path to publishing online.
The best toolkit is the one that gets you to page two instead of stalling on page one.
If you're stuck choosing, do this. Sketch thumbnails on paper for freedom, then finish pages digitally for editing and lettering. A mixed workflow is common, and beginners often find it less intimidating than going fully one way or the other.
From Idea to Script and Thumbnails
Most beginners jump from idea straight into drawing. That usually creates muddy pages, weak pacing, and a lot of redrawing.
Planning fixes that. Not because planning makes your comic rigid, but because it helps you make decisions while the drawings are still cheap to change.
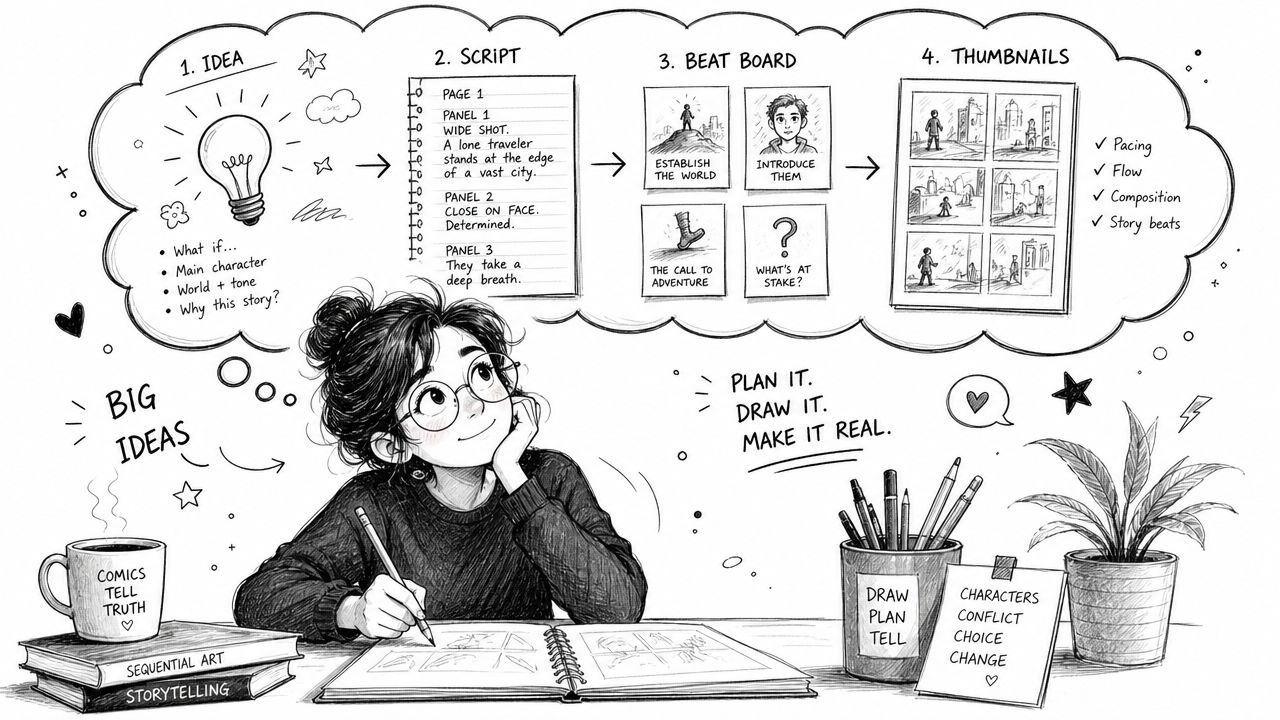
Start with a tiny script
For your first comic, keep the story so small that you can explain it in one sentence.
Something like: a kid sneaks into a forbidden room and finds a talking sword.
That gives you action, a setting, and a turning point. Enough for a short comic.
Then write a simple script page by page. If you need help seeing what comic script formatting looks like, this guide on how to write a graphic novel script is a solid reference point.
A beginner script doesn't need fancy formatting. It just needs clarity.
Try this pattern:
- Page number: Keep yourself oriented.
- Panel description: Describe what the reader sees.
- Dialogue: Write only what the character says.
- Caption or sound effect: Add only if it helps the moment.
Example:
- Page 1, Panel 1: Mia stands outside an old attic door, holding a flashlight.
- Panel 2: Her hand reaches for the knob.
- Panel 3: The door opens. Dust floats in the beam of light.
- Panel 4: A sword on the wall says, “You took your time.”
That's enough to draw from.
Thumbnail before you draw real pages
Thumbnailing means making tiny rough versions of your pages. These aren't pretty drawings. They're visual notes.
A thumbnail lets you answer important questions quickly:
- Where does the eye go first?
- Does this page need a big panel or several small ones?
- Is the reveal happening too early?
- Do I need a wider shot so the reader understands the room?
Tiny sketches solve big storytelling mistakes before they become painful.
Keep thumbnails small on purpose. When the drawing area is tiny, you stop fussing over eyelashes and jacket folds. You focus on pacing, staging, and clarity.
What to put in a thumbnail
Your thumbnail can be messy as long as it shows:
- Panel shapes
- Character placement
- Speech balloon placement
- Basic camera distance, such as wide, medium, or close
Don't worry if your stick figures look bad. If the page reads clearly in thumbnail form, it will usually read clearly when finished.
A common beginner mistake is making every panel the same size with every character shown from the same angle. Thumbnails help you spot that monotony early. A wide establishing image, then a medium reaction, then a close-up can create rhythm even with simple drawing.
Designing Characters and Drawing Pages
This is the stage where beginners often panic. They think every page needs polished anatomy, dramatic perspective, and cinematic rendering.
It doesn't. Your page needs to be readable first.
A clear comic with simple drawings beats a confusing comic with ambitious drawings every time.
Build characters from simple structure
A useful starting proportion for comic figures is 8.5 heads tall, with the same lesson also stressing that beginners should rely on geometric primitives like cylinders, boxes, circles, and triangles, and keep pages to 4 to 6 panels for clarity. That combination gives you a manageable framework for figures and storytelling. You can see that breakdown in this beginner comic drawing lesson on structure and page design.
If the “heads tall” idea feels abstract, don't overcomplicate it. It just means using the head as a measuring unit so the body stays consistent.
A simple hero can be built like this:
- Head as an oval
- Ribcage as a box
- Pelvis as another box or wedge
- Arms and legs as cylinders
- Hands and feet as simplified blocks
That sounds mechanical, but that's the point. Mechanical construction helps you rotate the body in space. It also stops your character from changing size from panel to panel.
If you want more focused help on shape language and memorable silhouettes, this article on comic character design is useful.
Keep character design easy to repeat
Your first comic should feature characters you can redraw without suffering.
That means choosing a few repeatable traits:
- Hair shape: Big triangle bangs, round curls, shaved sides
- Body shape: Tall rectangle, short circle, broad box
- Clothing marker: Hoodie, coat, scarf, helmet
- Expression range: Calm, anxious, smug, excited
You don't need intricate armor, twenty belt pouches, or detailed tattoos on your first project. Every extra design detail becomes repeated labor.
A good beginner character is less about decoration and more about recognition.
Turn thumbnails into page layouts
Once your thumbnails work, scale them up into full pages. Lightly pencil the panel borders first, then place figures, props, and backgrounds.
Work in layers of complexity:
- Panel borders and horizon lines
- Character placement
- Large environment shapes
- Dialogue space
- Final construction and details
This order matters because beginners often draw a detailed face first, then realize there's no room for the speech balloon. Plan the reading experience before the polish.
Why fewer panels usually work better
For beginners, 4 to 6 panels per page is a helpful limit. It forces you to simplify the moment and gives each panel room to breathe.
If you cram too many panels onto a page, several problems show up fast. Characters get tiny. Backgrounds disappear. Speech balloons compete for space. The whole page starts feeling crowded.
A page with fewer, clearer panels also helps you vary pacing. One larger panel can slow the reader down. A row of smaller reaction panels can speed things up.
Ink for clarity, not bravado
Inking scares beginners because it feels permanent. Treat it as a tracing of your best pencil decisions, not as a performance.
Focus on three things:
- Clean silhouettes
- Readable facial expressions
- Line weight that separates foreground from background
If your pencil drawing is weak, inking won't save it. But if the structure underneath is solid, even simple inks can look confident.
You also don't have to ink every page traditionally. If you're digital, your “inking” step might mean cleaning up your sketch into final line art on a new layer.
Coloring Lettering and Final Polish
A comic isn't finished when the drawing is done. It's finished when the reader can move through it smoothly.
That last stretch is where many beginner projects lose clarity. Color gets muddy, dialogue balloons cover important art, or the exported files look blurry. A little production discipline fixes a lot.
Use color to support the story
Color doesn't need to be elaborate. It needs to be consistent.
A useful rule for beginners is to assign each character a fixed palette and stick to it. That same production guidance also recommends at least 300 PPI for print and 150 PPI for web, and notes that color inconsistency is the third most frequent amateur error, affecting 40% of reader immersion negatively. Those details come from this digital comic finishing guide covering color continuity and export settings.
That means if your main character wears a muted green jacket and dark jeans, keep that combination stable unless the story gives you a reason to change it. Readers use color as a memory aid.
A simple palette system helps:
- Main character: one dominant color
- Second character: a contrasting dominant color
- Backgrounds: quieter tones so figures stand out
- Mood scenes: one lighting shift across the whole page, not random panel-by-panel changes
Lettering has one job
Lettering isn't decoration. It directs reading.
Bad lettering can ruin solid art, while plain readable lettering can carry average art surprisingly well.
Keep these habits:
- Put balloons where the eye naturally travels
- Leave enough margin inside the balloon
- Don't crowd the panel edges
- Break long dialogue into shorter beats
- Choose readability over stylized fonts
If the reader has to stop and decode your text placement, the story loses momentum.
When possible, place speech balloons during pencils or rough layouts, not at the end. That prevents the common mistake of finishing nice artwork and then covering half of it with text.
Export clean files
Technical details matter most at the very end. If you're posting online, export for web at the web resolution noted above. If you want to print, build the file at the print resolution from the start so your text and lines stay sharp.
Before exporting, do a final page check:
| Check | What to look for |
|---|---|
| Spelling | Dialogue, captions, sound effects |
| Balloon order | Left-to-right or top-to-bottom reading flow |
| Color consistency | Same character colors across pages |
| Edge cleanup | Stray marks, unfinished fills, missing blacks |
| Legibility | Can you read text easily at intended size? |
This part isn't glamorous, but it's where your comic starts feeling complete instead of merely drawn.
Have a Story but Cant Draw Try AI
Some people love comics but don't love drawing. That's fine.
You might be a writer with a script, a parent making a gift, a teacher building a classroom story, or someone who wants to prototype a graphic novel without spending years on anatomy studies. In that situation, AI-assisted comic creation can remove the biggest barrier.
Instead of drawing every panel by hand, you can start from story inputs. That means describing characters, settings, dialogue, and scene beats, then letting the system generate pages in a chosen visual style. For a lot of beginners, that makes comic creation feel possible for the first time.
A platform like make your own graphic novel is useful if your main skill is storytelling rather than illustration. It can also help if you want to test pacing, see a scene visually, or create a gift comic around real people and photos.
This route won't replace the craft of manual drawing if your goal is to become a cartoonist by hand. But it can do three very practical things:
- Prototype a story quickly
- Turn an idea into a shareable comic without drawing skill
- Help writers think in pages and panels instead of plain text
For some beginners, that's enough to spark momentum. And momentum matters more than waiting for perfect circumstances.
Your First Project The 5 Page MVP
Your first comic should be small enough to finish before doubt takes over.
That's why a 5-to-10-page “shitty MVP” works so well for first-time creators. In the guidance behind this approach, the emphasis is on finishing first, with a nearly 100% completion rate for novices, while perfectionist approaches often lead to abandonment rates exceeding 80%. Those figures appear in the earlier production advice and support the same point qualitatively here: small scope wins for beginners.
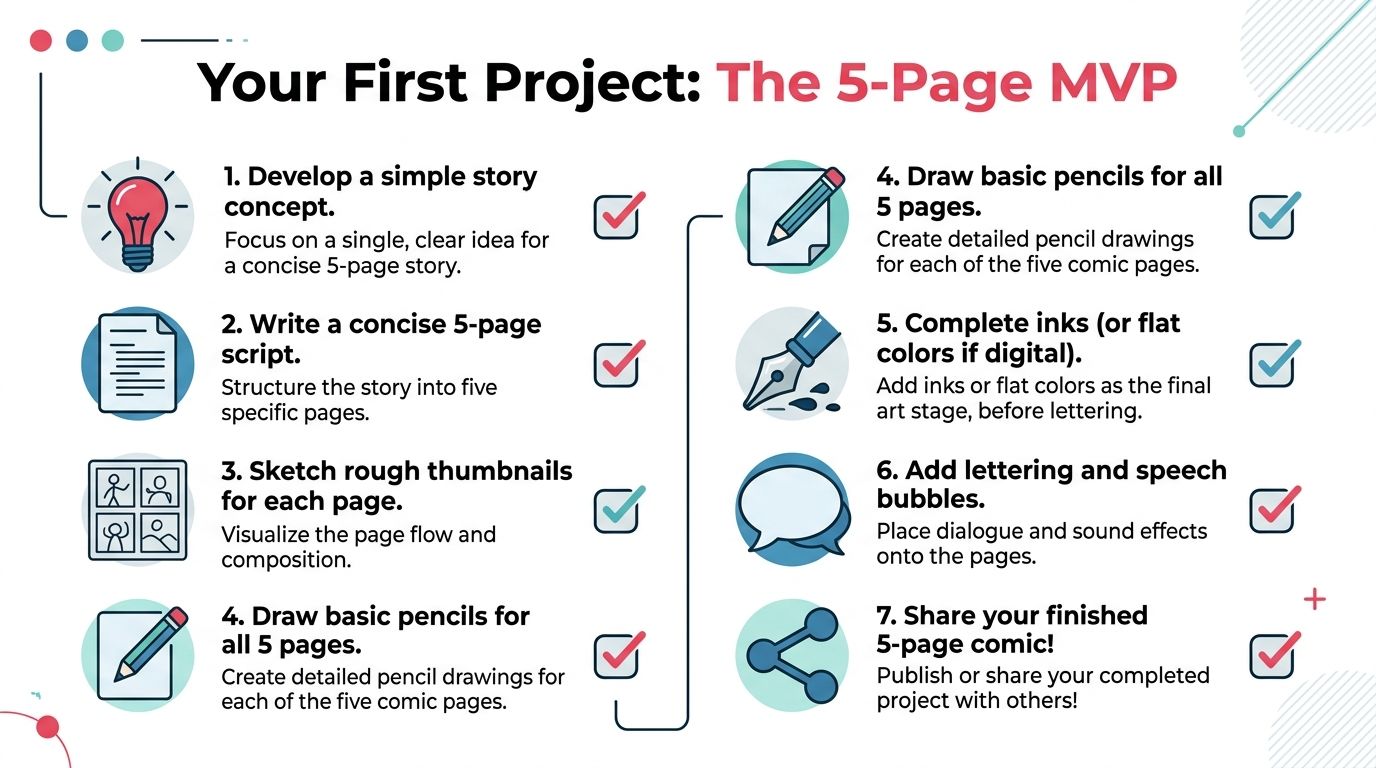
A five-page project that teaches the whole process
Five pages is enough to feel like a real comic, but short enough that you can survive your mistakes.
Use one simple story arc:
- Page 1: setup
- Page 2: complication
- Page 3: escalation
- Page 4: turning point
- Page 5: ending
That structure gives you a beginning, middle, and end without inviting sprawl.
Your checklist
Print this mentally and keep moving.
- Write one sentence. Keep the premise plain and drawable.
- Turn it into a short script. One page at a time, panel by panel.
- Thumbnail all five pages. Solve reading flow before detail.
- Pencil every page before polishing any page. That keeps the whole project moving.
- Ink or clean up line art. Choose clarity over showing off.
- Add lettering and simple color if you want it. Readability comes first.
- Export and share it. Finished beats hidden.
Reality check: Your first comic will probably look less impressive than it felt in your head. Finish it anyway.
That discomfort is part of learning. You're training your taste and your execution to meet in the middle.
What success actually looks like
Success is not “people think I'm professional.”
Success is:
- You finished all five pages.
- The reader can follow the story.
- You learned what slowed you down.
- You know what to improve on the next one.
That's the beginner milestone. Not perfect anatomy. Not a gorgeous cover. A complete comic with an ending.
If you've got a story ready but don't want the full drawing grind, PersonalizedComics gives you another way to get it made. You can turn ideas, photos, and scripts into fully illustrated comic pages in multiple art styles, with no subscription required and a free three-page preview comic for a first project. It's a practical option for prototyping a graphic novel, making a one-of-a-kind gift, or finally turning that idea in your head into a finished comic.