The right file format for printing depends on what your comic contains and how the printer will process it. A multi-page story with speech bubbles needs different handling from a standalone photograph or a vector logo. This guide treats export as a production workflow, not a dry list of file extensions, so you can choose the format that protects your artwork from creation through press.
Why the Right File Format Matters When You Print a Custom Comic
A comic page combines several kinds of content at once. It may contain raster-painted backgrounds, AI-generated character art, vector speech balloons, captions, sound effects, and trim-sensitive borders. Each element can react differently when you move from a screen-based design tool to a print workflow.
A poor export can create problems that aren't obvious until the physical book arrives. Text may look crisp in the editor but become soft after rasterization. Transparent effects can produce pale halos against the paper. RGB colors may change when converted for print, and a page without enough bleed can reveal a narrow white edge after trimming.
Start with the content, not the extension
Ask what the file needs to preserve:
- Text and layout: Speech bubbles, captions, panel borders, and page order need a format that keeps positioning stable.
- Painted artwork: Large raster areas need sufficient resolution and controlled compression.
- Transparency: Glows, shadows, smoke, and layered effects need careful flattening or a print-compatible PDF workflow.
- Vector objects: Logos, signatures, and geometric lettering should retain clean edges when resized.
- Production instructions: Bleed, trim, color profiles, and embedded fonts must travel with the artwork.
The printer isn't judging whether your file looks impressive in the design application. The production system needs a self-contained document it can interpret consistently. That means fonts should be embedded or converted to outlines, images should be prepared at their final size, and every page should share the intended dimensions.
Production rule: Treat the export as the handoff between your creative decisions and the printer's equipment. If the file leaves important decisions unresolved, the printer may need to make them for you.
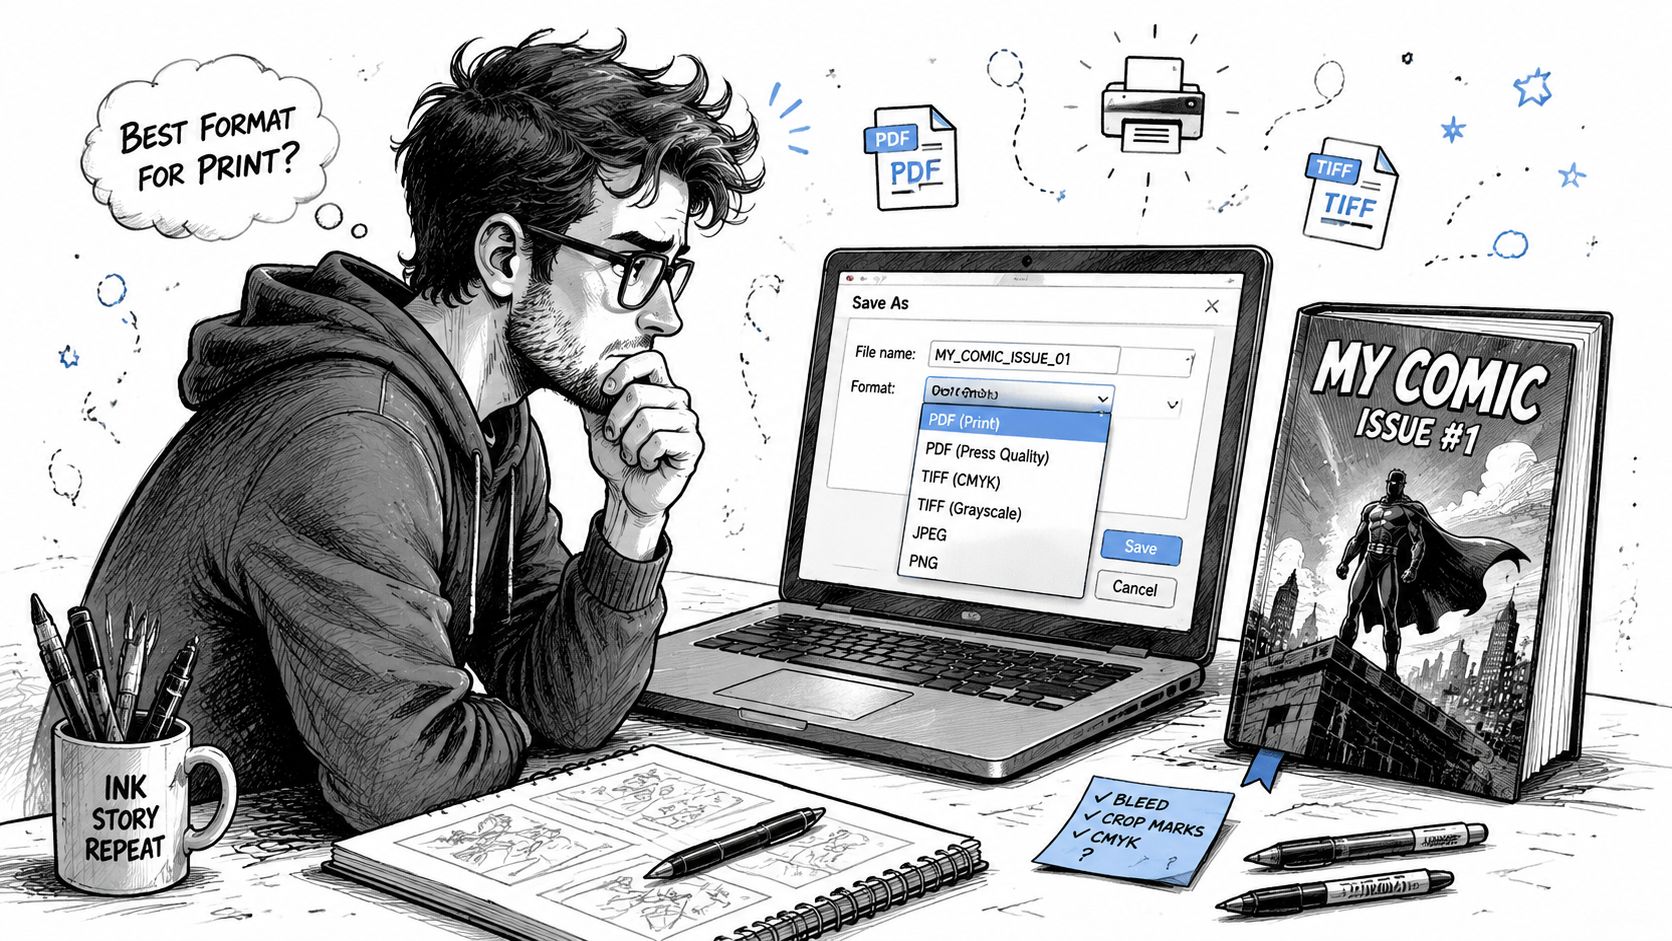
For most multi-page comic orders, a print-ready PDF/X file is the practical starting point. A flattened TIFF can be useful for a single image page, while an editable PSD should remain your working master rather than your delivery file. The best choice becomes much easier once you understand why these formats exist.
The Foundations of Print-Ready Files
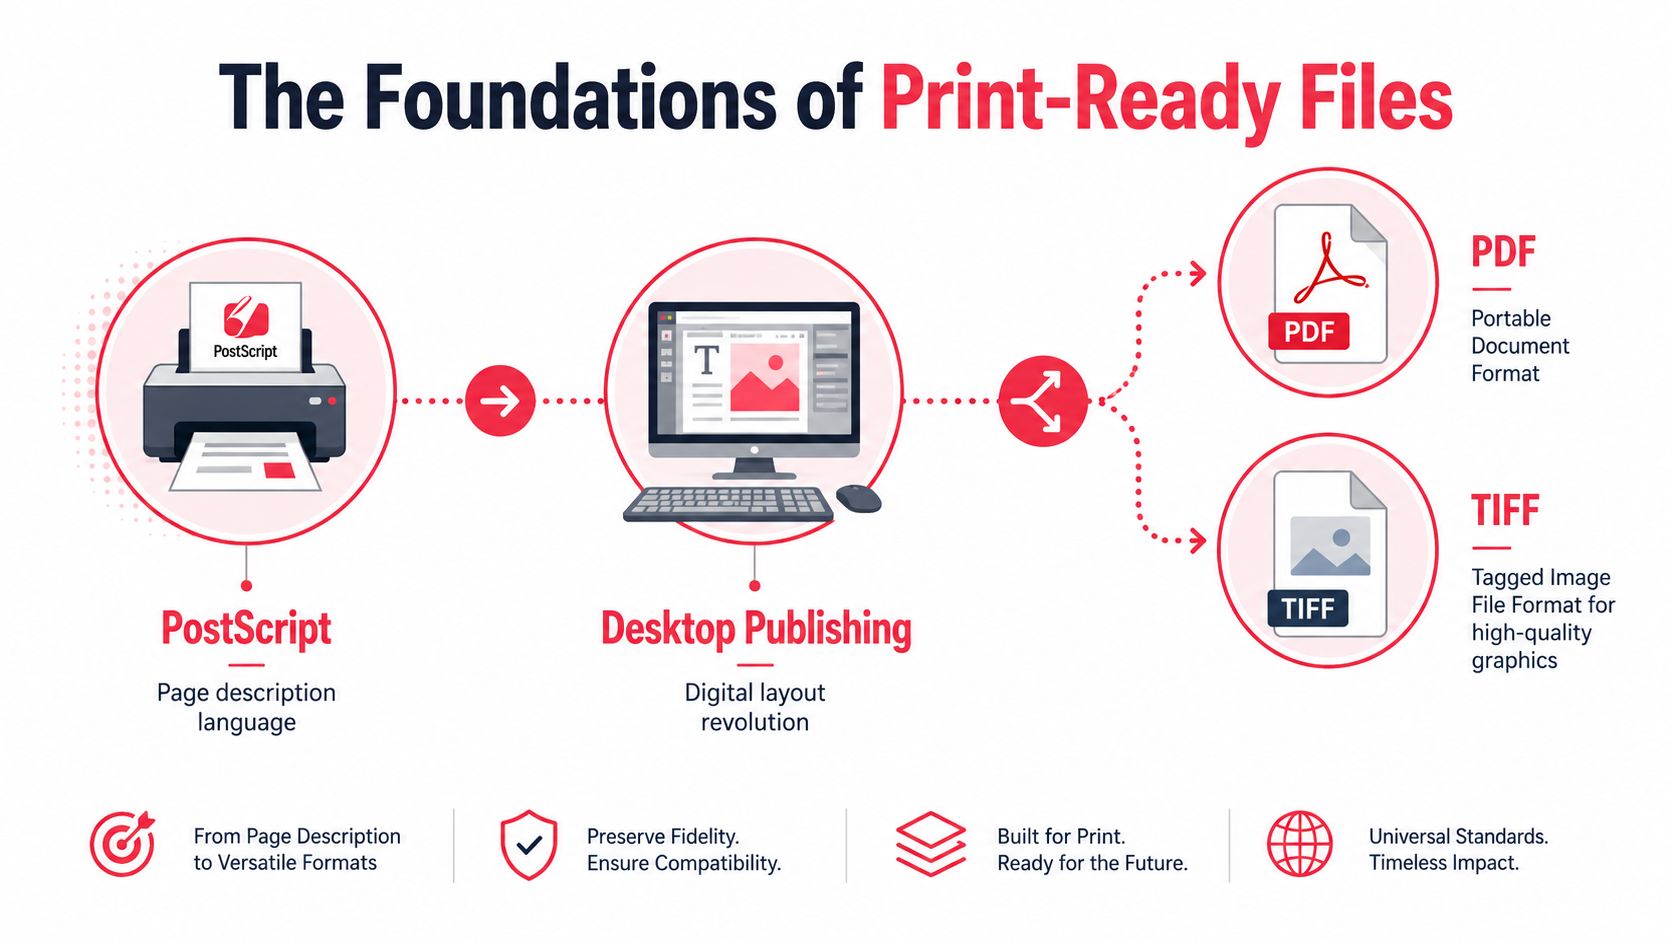
Modern print files grew from a need to describe a page independently of a particular device. PostScript played a major role in that transition. The Computer History Museum's account of PostScript and digital printing explains how PostScript and the Adobe Type Library changed printing and publishing, helping drive desktop publishing in the 1980s.
PostScript described text and graphics as instructions for an imaging device rather than as a fixed screenshot. Adobe's Apple LaserWriter connected that page-description approach with printer hardware, and the language became widely compatible as Adobe published its details for other manufacturers. PDF developed from that imaging model and became easier to exchange between creators, prepress operators, and printers.
Why PDF became the usual handoff
PDF was designed to preserve layout, fonts, graphics, and device independence. Adobe first developed it in 1993, and PDF became standardized as ISO 32000-1 in 2008, according to the International Organization for Standardization's PDF standard. That standard defines a digital document format for exchanging and viewing files independently of the environment used to create, view, or print them.
Print production then developed more specialized PDF standards:
- PDF/X, ISO 15930: Designed for graphic arts and professional print exchange.
- PDF/A, ISO 19005: Intended for long-term preservation.
- PDF/VT, ISO 16612: Created for variable-data and personalized high-volume printing.
The revised PDF 2.0 standard, ISO 32000-2, was published in 2020, showing that PDF remains an active document and print foundation rather than a discarded legacy format.
For comic creators, the practical distinction is between a general PDF and a PDF/X export. PDF/X settings can make the handoff more predictable by requiring or controlling items such as embedded fonts, color information, and print-related metadata. They don't make an unsuitable page magically print well, but they reduce the number of unresolved production choices.
Raster and vector in one comic page
A raster image stores color as pixels. Its quality depends on the pixel dimensions at the final printed size, commonly discussed through DPI or PPI. A vector image stores mathematical paths, so lines and shapes can scale without becoming pixelated.
Comic pages usually mix both:
- Painted characters and backgrounds are raster artwork.
- Speech-balloon outlines and logos may be vector objects.
- Text can remain live in a layout application or become outlined paths.
- Effects such as glows and shadows may rely on transparency until export.
Color adds another layer. Screens use RGB light, while many print workflows prepare artwork in CMYK ink channels. An embedded ICC profile tells compatible software how to interpret those colors. Profiles such as SWOP, GRACoL, or FOGRA39 may appear in printer specifications, but you should follow the receiving printer's named profile rather than choosing one casually.
For a broader look at building pages digitally, see this guide to making graphic novels on a computer. The important lesson is simple: a print-ready file isn't merely a large image. It's a controlled description of artwork, size, color, type, and finishing boundaries.
Every Common Print Format Explained
No single format wins for every comic asset. Professional print guidance commonly distinguishes between PDF, TIFF, JPEG, EPS, and PS, with the right choice depending on whether the job contains images, logos, or mixed layouts, as outlined in this print format FAQ from the University of Minnesota.
PDF/X
PDF/X is the default choice for a multi-page comic. It can hold page geometry, text, images, vector objects, bleed, and color information in one handoff file. A PDF/X export is especially useful when your pages contain speech bubbles and captions because the layout remains together instead of requiring the printer to assemble separate assets.
Choose a PDF/X preset that matches the printer's requirements. PDF/X-1a is more restrictive and commonly relies on flattened transparency, while PDF/X-4 can preserve more modern transparency behavior when the receiving workflow supports it. Don't assume the newest preset is automatically safer. The printer's specification decides.
TIFF
TIFF suits single-page, image-heavy artwork. It can preserve raster detail without the repeated quality loss associated with aggressive JPEG saving. A flattened CMYK TIFF is a dependable option when a printer specifically requests an image-only page.
TIFF is less convenient for an entire comic because it doesn't naturally provide the same layout and page-management experience as a print-ready PDF. Use it when the production workflow asks for individual pages or when the page is effectively one finished raster composition.
PNG
PNG is helpful for sharp digital line art and transparent graphics. It can be useful for an isolated logo or an asset that must retain transparency during editing. However, PNG isn't a universal professional print handoff because CMYK support can be limited in common workflows.
Keep PNG as an intermediate asset unless the printer explicitly accepts it for the intended product.
JPEG
JPEG isn't automatically wrong. A maximum-quality JPEG can work for a photographic cover or a fully painted interior where small compression savings matter more than editable structure. It becomes a poor choice for flat-color comics when compression creates blocking around text, clean fills, or sharp panel edges.
Save the JPEG once from the prepared master. Don't repeatedly open and resave it.
PSD
PSD is the right working master for Photoshop projects because it preserves layers, masks, adjustment layers, and editable type. It isn't usually the right delivery file. Different prepress systems may interpret hidden layers, alpha channels, or unsupported effects differently.
Keep the PSD safely archived, then export a controlled PDF/X or flattened TIFF for submission.
EPS and SVG
EPS remains useful for logos, signatures, and other vector graphics, although its older workflow quirks make it less convenient than a modern PDF in many print environments. SVG works well inside vector tools for scalable logos, icons, and lettering, but many printers don't want an SVG as the final multi-page comic file.
| Format | Best Comic Use | Lossless? | CMYK Support | Multi-Page | Verdict |
|---|---|---|---|---|---|
| PDF/X | Complete comic pages and mixed layouts | Depends on placed assets and settings | Yes, when prepared correctly | Yes | Preferred handoff |
| TIFF | Flattened, image-heavy single pages | Yes | Yes | Usually no | Strong alternative |
| PNG | Transparent assets and sharp line art | Yes | Limited in some workflows | No | Use as an asset unless accepted |
| JPEG | Photos and painted artwork | No | Workflow-dependent | No | Acceptable at high quality |
| PSD | Editable layered master | Yes | Yes | No | Keep as backup |
| EPS | Logos and vector graphics | Yes for vector content | Often | No | Legacy asset format |
| SVG | Logos, icons, vector lettering | Yes for vector content | Workflow-dependent | No | Use inside vector workflows |
Resolution, Color, Bleed, and Fonts Compared
A file can have the right extension and still fail preflight. Four checks matter most for a comic page: resolution, color, bleed, and typography. Use the table as an audit sheet before exporting.
The resolution figures in this table come from the supplied print-preparation guidance for this workflow. The 300 DPI minimum, 600 DPI for small line art, 0.125-inch bleed, 0.25-inch safe area, and 350 DPI PersonalizedComics interior threshold should be treated as production settings, not decorative suggestions.
| Spec | Requirement | Best File Format | PersonalizedComics Threshold |
|---|---|---|---|
| Raster resolution | 300 DPI minimum at final size. Use 600 DPI for line art under 4 x 6 inches. | TIFF for flattened art, PDF/X for complete pages | 350 DPI for interior pages |
| Color space | Convert from RGB to the printer's required CMYK profile, such as SWOP, GRACoL, or FOGRA39, when specified | PDF/X or flattened CMYK TIFF | Follow the production specification |
| Bleed | Add 0.125 inch on every edge. Keep essential content at least 0.25 inch inside trim | PDF/X with document bleed | Use the product's required page dimensions |
| Fonts | Embed fonts in the PDF or convert text to outlined paths | PDF/X, outlined vector PDF | Verify before upload |
Resolution describes the amount of image information available at the printed size. A document set to 350 DPI doesn't protect a small, low-resolution character image that has been enlarged dramatically. Check the effective resolution of each placed image, not just the resolution field in the project.
For page dimensions and trim planning, use the comic book page size guide alongside the printer's specifications. Bleed belongs outside the trim line, while speech balloons, faces, captions, and signatures belong inside the safe area. A background should continue through the bleed so trimming doesn't expose a white strip.
Color requires equal care. An RGB file can look vivid on a backlit monitor yet reproduce more subtly on paper. Convert once into the specified CMYK profile, inspect important colors, and avoid repeatedly converting the same file between profiles.
A clean export has two boundaries: artwork extends past the trim, while critical information stays comfortably inside it.
Step-by-Step Export Examples From Design Tools
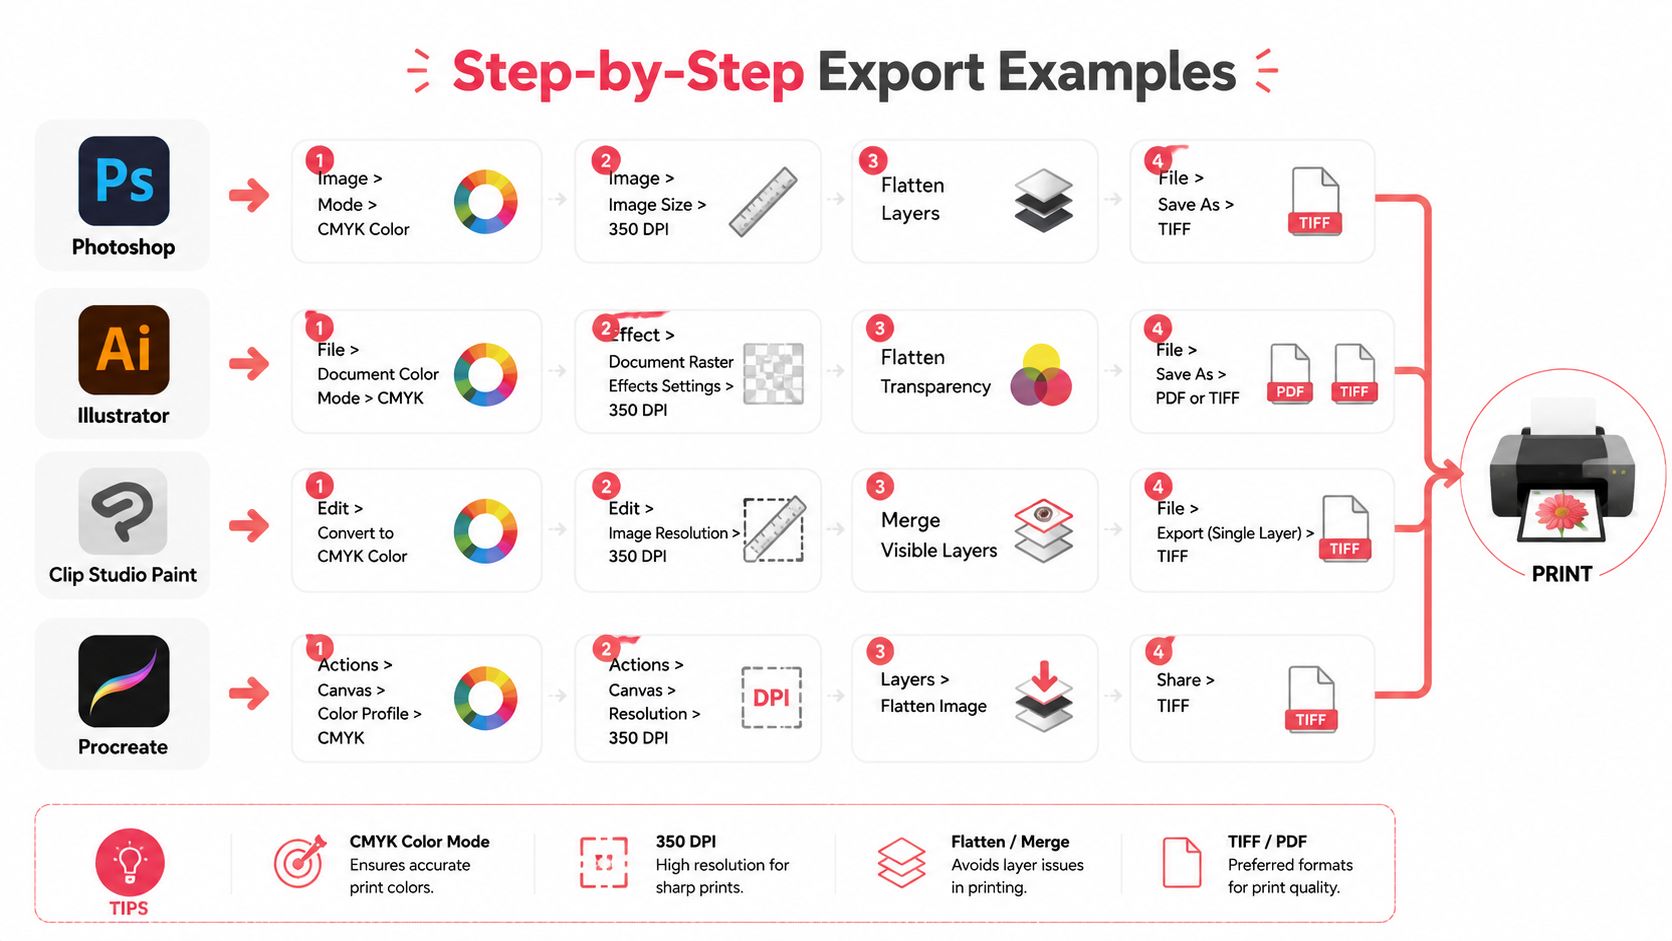
Your exact clicks depend on the application, but the production logic stays consistent: establish the final page size, verify resolution, prepare color, control layers, and export a self-contained file.
Photoshop
For a Photoshop page, preserve the layered source first. Then create a print copy and use this sequence:
- Select Image > Mode > CMYK Color.
- Open Image > Image Size and confirm 350 DPI for the interior page.
- Check the pixel dimensions at the final printed size.
- Add the required bleed by extending the canvas or using the document setup.
- Flatten the print copy after checking transparency, masks, and adjustment layers.
- Choose File > Save As > TIFF and use LZW compression.
- Duplicate the prepared file and choose File > Save As > Photoshop PDF, using ZIP compression where the workflow supports it.
The TIFF gives you a flattened raster fallback. The PDF gives you a more practical page handoff when you need to combine the story into one document.
Procreate
In Procreate, create each page at the final dimensions with the required bleed. Before export, review the page at full size and confirm that text and line work remain sharp. Use Share > PDF (Print) with Include Crop Marks enabled when that matches the receiving printer's instructions.
Export pages individually rather than as a flattened spread. A spread can create problems when the printer expects separate pages with clear trim boundaries.
Illustrator
Illustrator works well for vector-heavy pages, logos, lettering, and clean geometric artwork. Set the document bleed to 0.125 inch, then choose File > Save As PDF and select the Press Quality preset.
Before saving, use Convert All Text to Outlines if the printer requires outlined lettering. Inspect the outlined text carefully, because you won't be able to edit it as live type after conversion.
InDesign
InDesign is practical for assembling a complete comic. Place prepared page artwork, check page order, and export through File > Adobe PDF Presets > PDF/X-4:2010 when the printer supports that standard. Set marks and bleeds to 0.125 inch, and use high compatibility settings for transparency flattening when required by the production specification.
For cover construction and wraparound artwork, keep the separate page geometry and spine instructions in view. The custom comic book cover guide can help you plan that part of the project.
The PersonalizedComics handoff
Upload the PDF/X file, or the flattened TIFF when specifically requested, through the Premium Print order page. Attach a proof JPG for color comparison, keep the layered PSD as your backup, and don't delete the source until you've reviewed the physical result.
Myths That Cause Failed Print Uploads
Myth one: JPEG is always bad. A high-quality JPEG can be suitable for a photographic cover or fully painted art. It isn't a good default for flat-color panels, small type, or crisp line work because compression can create visible blocks and ringing.
Myth two: 300 DPI fixes everything. Resolution can't correct an RGB color workflow, an incorrect profile, missing bleed, or a badly enlarged source image. Confirm the color mode and effective resolution together.
Myth three: SVG is the future of print, so every comic should be SVG. SVG is useful for vector assets, but a multi-page comic usually combines raster art, text, effects, and production geometry. Use SVG for logos, signatures, and vector elements when the receiving tool supports it, then place those assets into the final page file.
Myth four: Bleed is optional for digital-first creators. A full-bleed splash page needs artwork beyond the trim edge. Without that extra area, cutting variation can leave an unwanted white sliver.
Myth five: Flattening never matters. Flattening can be important when transparency, hidden layers, or masks might be interpreted differently by the printer's system. It can also remove editability, so preserve the layered master and flatten only a dedicated print copy.
The useful rule isn't “always use one format.” It's “match the format to the content and the production request.”
Troubleshooting Print File Errors
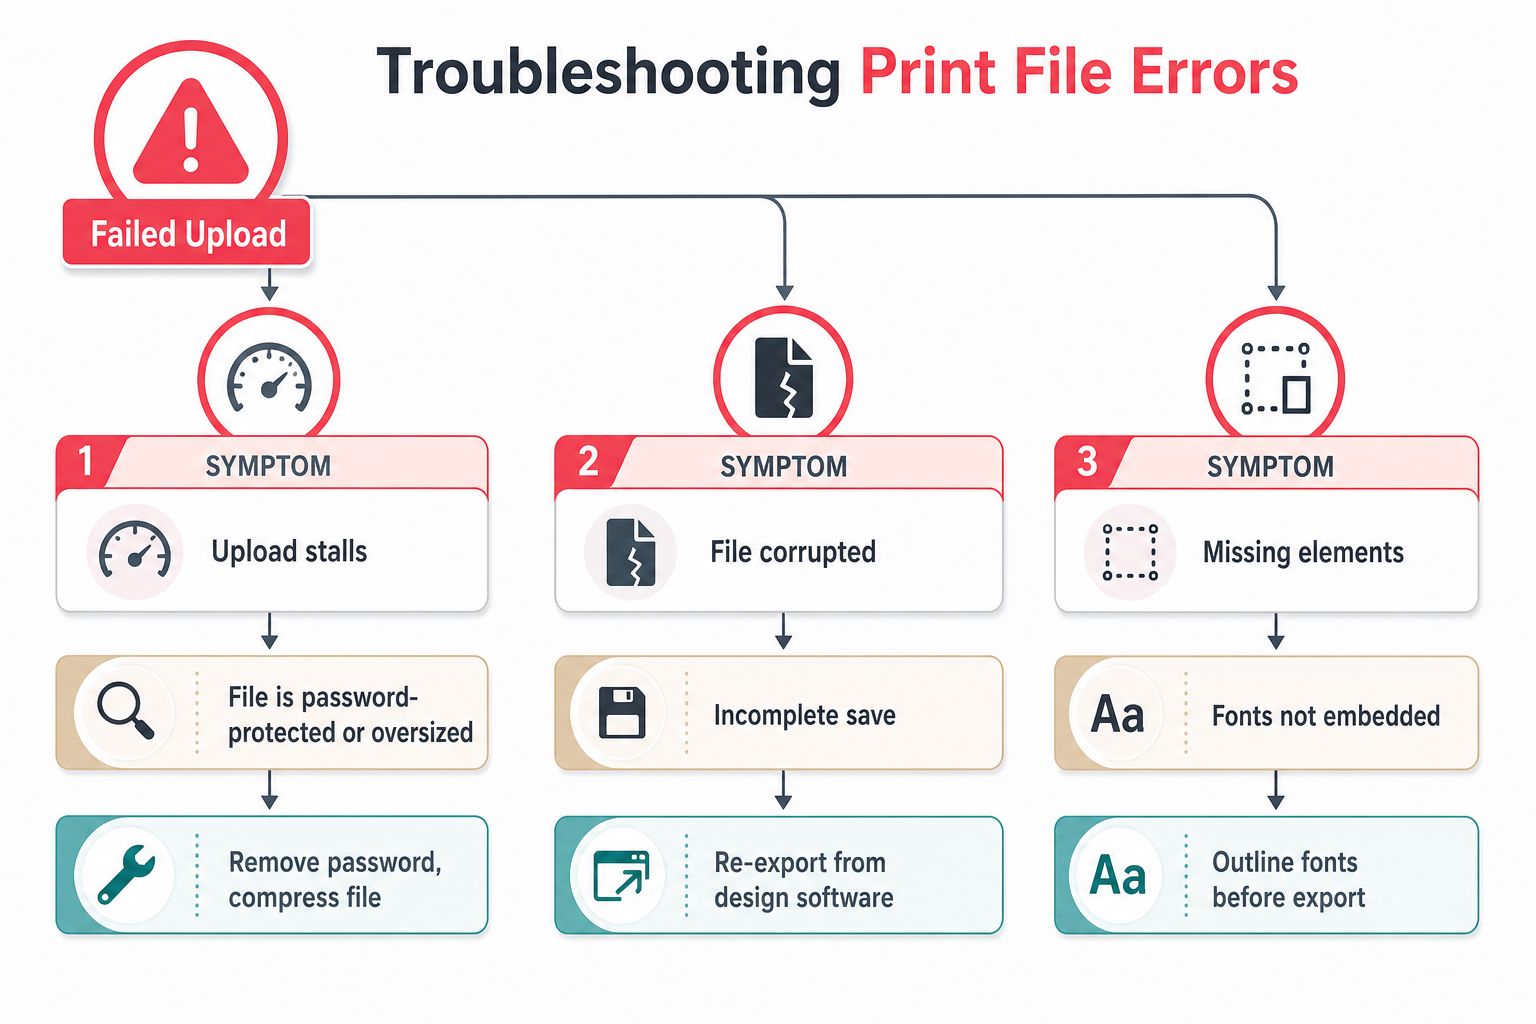
Start with the symptom, then test the most likely cause before rebuilding the entire project.
- Upload stalls: Check whether the PDF or TIFF is password-protected, unusually large, corrupted, or dependent on missing fonts. Remove security, reopen the exported file, and retry.
- A page appears blank: Inspect layer visibility in the source file and look for an empty first page in the PDF. Re-export with only the intended visible artwork.
- Colors shift: Confirm whether the document remains RGB, uses a screen-oriented ICC profile, or contains unintended transparency. Convert once to the named CMYK profile required by the printer, then inspect the result.
- Artwork looks soft: Check the placed image's effective resolution at final size. Replace an insufficient asset rather than trusting the project's nominal DPI setting.
- Edges or text are clipped: Add the required bleed, extend backgrounds beyond trim, and move important content inside the safe area.
- Text disappears or changes: Embed fonts in the PDF or outline the text in the editing application.
- Page sizes don't match: Inspect each page's MediaBox and trim dimensions. Remove mixed page sizes before exporting the final document.
For a PersonalizedComics order, preserve the original source and re-export from it instead of repeatedly modifying the failed delivery file. Use the preview or proof to compare page order, dimensions, spelling, missing elements, and image quality before uploading a revision.
Print-Ready Checklist and Final Thoughts
A reliable handoff routine is short enough to use every time:
- Choose the container: Use one multipage PDF/X file when possible. Use TIFF, PNG, JPEG, PSD, EPS, or SVG only when the intended product and printer explicitly accept that format.
- Check page geometry: Confirm every page has the required trim size, consistent dimensions, and the printer's bleed.
- Protect the story: Keep speech balloons, captions, signatures, faces, and borders inside the safe area.
- Audit images: Confirm each placed raster asset reaches the required resolution at its final printed size.
- Prepare color: Match the required CMYK profile and avoid repeated profile conversions.
- Secure typography: Embed fonts or outline critical text.
- Clean the file: Remove guides, notes, hidden layers, crop marks that weren't requested, and low-resolution placeholders.
- Inspect the export: Open the final PDF or TIFF and review every page at 100% zoom for missing content, pixelation, transparency problems, and color shifts.
- Name and preserve it: Include the project name, trim size, page count, and revision in the filename. Save both the uploaded file and the proof.
A print-ready comic is more than a high-resolution image. It's a correctly sized, consistently colored, self-contained document that carries the creator's layout decisions into production without guesswork.
PersonalizedComics turns photos and story ideas into illustrated comic pages, then provides a path to order a physical premium copy. Prepare your pages with the correct file format for printing, inspect the proof carefully, and visit PersonalizedComics to create and print your own one-of-a-kind comic.
Filed under Making Your Comic