Design Your Own Custom Flip Books Easily
You’re probably here because a normal gift feels too flat.
A framed photo is nice. A printed card is fine. But a custom flip book does something those don’t. It turns a private joke, a proposal moment, a kid’s superhero idea, or a goofy dance clip into something people touch, replay, and keep on a desk instead of burying in a camera roll.
That’s why flip books still work. They’re small, physical, and surprisingly emotional. When the pages move, the idea lands fast. You don’t need a long attention span, special software, or animation training to make one that feels personal. You just need a simple action, a clean sequence, and a file that won’t fall apart at print time.
The Enduring Magic of Custom Flip Books
The best custom flip books usually start with a very ordinary problem. You want to make something memorable for a birthday, anniversary, classroom project, wedding table, or creative promo piece, and every option starts to look interchangeable. A mug can be customized. A poster can be customized. Even a photo book can be customized. But most of them stay static.
A flip book doesn’t. That’s the charm.

When I’ve made custom flip books for gifts, the strongest ones weren’t the most polished. They were the ones built around one clear moment: a couple hugging, a dog jumping for a treat, a child turning into a caped hero, a friend making an exaggerated reaction face. The medium rewards clarity more than complexity.
That’s part of why flip books have lasted so long. Traditional flip books go back to the 19th century, and the first patented version was created by John Barnes Linnett in 1868 under the name kineograph, according to this historical reference on flip books and classroom materials. They predate motion pictures by decades, which gives them more weight than is commonly understood.
Why they still feel fresh
Custom flip books sit in a sweet spot between craft and storytelling. They feel handmade even when you build them digitally first. They’re also forgiving. A little wobble can add energy. Slightly rough linework can feel charming. Even stylized frames can work if the motion reads.
Here’s what makes them different from other personalized items:
- They create a reveal: The motion doesn’t exist until someone interacts with it.
- They’re short by design: One small action is enough.
- They invite replay: People flip them again immediately.
- They work across styles: Hand-drawn, photo-based, comic-inspired, or digitally illustrated sequences can all succeed.
A flip book doesn’t need a big story. It needs one moment that earns being watched twice.
Old format, modern options
That old analog magic is exactly why the format pairs so well with modern tools. You can still draw every frame by hand if that’s your thing. You can also start with a phone video, a burst of photos, or a stylized comic sequence generated from your own idea.
That last option is the one most tutorials barely touch, and it opens the format up to a lot more people. If you can describe a scene, gather reference photos, or shape a short visual narrative, you can build a flip book without needing traditional animation skills.
From Concept to Storyboard Your Flip Book
Before you choose paper, export settings, or printing options, decide what the flip book is supposed to make someone feel. That decision fixes a lot of later problems.
A good planning shortcut comes from a performance framework used in digital flipbooks: Are users finding content efficiently, where does attention translate into action, and which choices influence outcomes? The same logic works for physical custom flip books. The “action” is the key visual moment. The “outcome” is the reaction you want. That framing comes from Publitas’ discussion of flipbook performance metrics.
Start with the emotional outcome
Don’t begin by asking, “What should I animate?” Ask, “What reaction do I want?”
Usually it’s one of these:
- A laugh: Someone slips on a banana peel, does a double take, or changes outfits instantly.
- A sentimental hit: Two people move into a hug, a pet runs into frame, or a child waves.
- A surprise: A character transforms, opens a gift, or reveals a message.
- A dramatic beat: A hero lands, a monster appears, or a race ends in a freeze-frame pose.
If the answer is “all of the above,” the concept is too broad. Flip books are short-form storytelling. They don’t reward subplots.
Choose one action that reads instantly
The motion has to be obvious even when the pages move fast. Subtle acting can work on screen. In a flip book, it often disappears.
Actions that usually work well:
- Approach and contact. Walking into frame and hugging, high-fiving, or kissing on the cheek.
- Transformation. Regular outfit to superhero costume, human to cartoon, plain room to fantasy scene.
- Reaction. Surprise face, laughing fit, jumping back, or cheering.
- Loopable movement. Waving, dancing, hair blowing, or a character bouncing.
Actions that often fail:
- Two people talking with small mouth changes
- Long camera moves
- Tiny hand gestures
- Busy backgrounds with little subject movement
Practical rule: If you can describe the motion in one short sentence, it’s probably workable.
Storyboard with six to twelve checkpoints
You don’t need a full animator’s board. You need anchor moments.
Use a sheet of paper, index cards, or a digital canvas and mark the sequence like this:
| Checkpoint | What to define |
|---|---|
| Start pose | Where the subject begins |
| Early motion | The first clear change |
| Midpoint | The strongest transition |
| Key moment | The emotional or comic peak |
| Settle | The movement after impact |
| End pose | Where the sequence lands |
If you’re using photos or video, this storyboard helps you shoot what you need. If you’re using digital art or AI-generated comic imagery, it keeps the visual language consistent from frame to frame.
Keep the frame composition stable
A common beginner mistake is changing too much at once. The character moves, the background shifts, the crop changes, and the perspective drifts. That creates jitter.
Better approach:
- Lock the camera angle: Keep the viewpoint steady.
- Keep the subject large: Small figures lose readability.
- Limit background detail: Motion should lead the eye.
- Save the biggest change for the key moment: Don’t spend all your energy in frame three.
I’ve found that custom flip books become much easier to finish once the concept gets smaller. A single action with a strong silhouette beats an ambitious mini-movie almost every time.
Choosing and Editing Your Flip Book Frames
The project becomes tangible at this stage. You need a sequence of images that changes cleanly from page to page. There are three practical ways to get there: pull frames from video, shoot a controlled photo sequence, or build a stylized sequence through digital art or AI-assisted comic creation.
Each method works. Each has trade-offs.
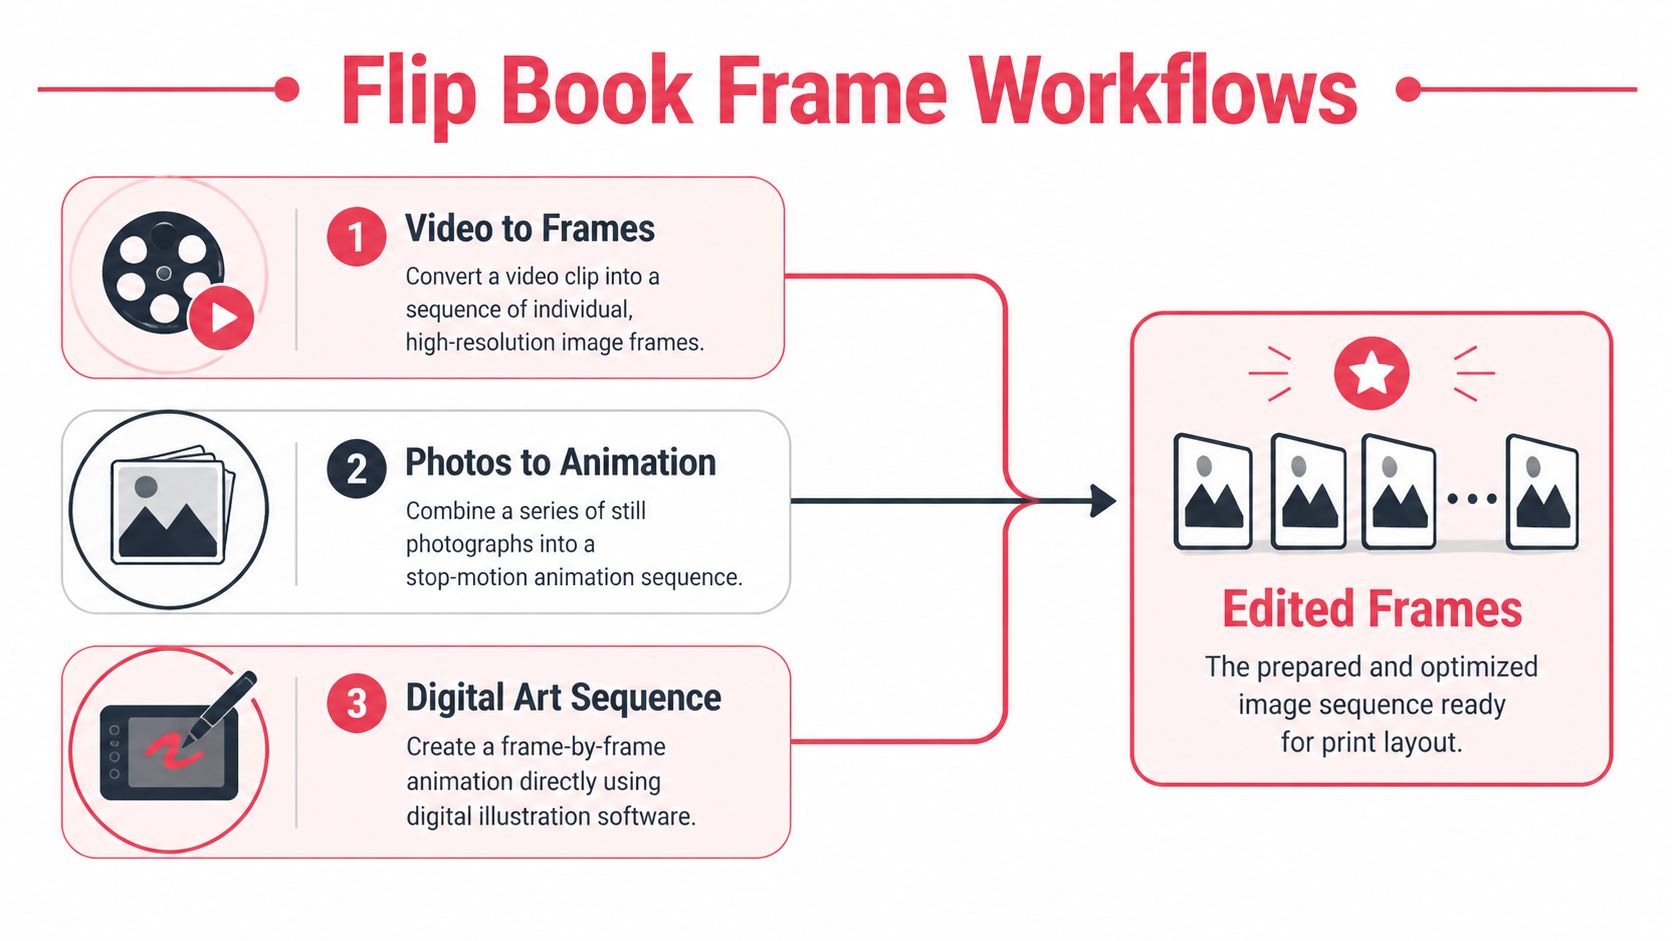
A big blind spot in most tutorials is the AI route. That matters because a 2025 report noted that AI animation software usage surged 45% in creative hobbies, yet guides still rarely explain how to turn AI comic strips into flip book motion, as noted in this discussion of flip book opportunities and gaps.
Workflow comparison
| Method | Best for | Strength | Main risk |
|---|---|---|---|
| Video to frames | Real people, pets, event moments | Natural motion | Too many similar frames |
| Photos to animation | Stop-motion feel, controlled gestures | Easy to direct | Stiff transitions |
| Digital art or AI sequence | Stylized gifts, fantasy, comic looks | High creative freedom | Inconsistent character continuity |
Video to frames
If you already have a short clip, this is usually the fastest workflow. A phone video is enough if the lighting is decent and the action is clear.
What works:
- A short, simple movement
- Strong contrast between subject and background
- A locked or mostly steady camera
What doesn’t:
- Fast panning
- Motion blur
- Crowded scenes
- Tiny facial changes as the main action
Pull your video into any editor you’re comfortable with and export stills from the strongest section. Don’t use every frame. That’s one of the most common mistakes. A dense sequence can make the final book feel sluggish because each page changes too little.
Instead, sample selectively. You want visible progress from page to page. If the person raises a hand, each chosen frame should show the hand noticeably higher than the one before it.
Photo sequence to animation
This is my favorite method when I need control. You can direct each pose, keep lighting consistent, and avoid the messiness of a random video clip.
Use a phone burst, a tripod, and a plain setup if possible. Ask the subject to move in small, even increments.
Good candidates:
- Jumping and landing
- Waving
- Holding up signs
- Costume reveals
- Prop-based gags
Keep the camera fixed. If the camera shifts between shots, you’ll spend extra time aligning every image later. Even a stack of books as a support is better than handholding.
If you want the flip to feel smooth, consistency matters more than realism.
The editing stage is straightforward but important:
- Crop all frames the same way: Eyes, hands, or the main face position should stay in a stable area of the page.
- Correct exposure together: Don’t edit one image at a time with different settings.
- Remove weak frames: A shorter sequence with cleaner transitions beats a longer one with dead spots.
- Test playback early: Scroll through the images quickly on screen before laying them out.
Digital art and AI-generated comic frames
This is the most exciting option for personalized gifts because it lets you make motion from scenes that never existed on camera. You can turn a couple into manga characters, a child into a fantasy hero, or a friend into a cyberpunk detective, then animate a simple action across sequential frames.
If you want to start from portraits and stylize them first, this guide on turning photos into comic book art is a useful reference point for building source imagery before you break it into a motion sequence.
The challenge is continuity. AI-generated images often drift. Hair changes. Clothing details mutate. Hands move strangely. Backgrounds reinvent themselves. For a poster, that might be fine. For custom flip books, it ruins the motion.
To avoid that, keep your prompts and visual constraints tight:
- Use one scene only: Don’t change location mid-sequence.
- Describe one action: “Character raises sword overhead” is better than “epic battle scene.”
- Keep wardrobe specific: Repeat the same clothing details each time.
- Hold the camera view steady: Ask for the same angle and framing across frames.
- Generate in checkpoints: Start, quarter turn, midpoint, peak action, settle, end pose.
Then edit the resulting images like a human, not like a prompt machine. You may need to repaint details, crop aggressively, or replace a bad frame manually.
What to edit before print
No matter which workflow you use, your frame set should pass four tests before you move on:
- Readability: Can you tell what’s happening in a quick flip?
- Consistency: Does the subject stay recognizable from page to page?
- Motion spacing: Are the changes between frames even enough?
- Finish point: Does the sequence land on a satisfying final image?
A quick diagnostic method is to place the frames in order and scrub through them fast on your computer or tablet. If one frame jolts your eye, it’ll feel worse in print. Fix it now.
Layout Tips and Print-Ready File Export
Many custom flip books fail at the least glamorous stage. The artwork is charming. The sequence works. Then the printed piece comes back with awkward trimming, muddy color, or important details chopped off near the thumb edge.
That’s not a creativity problem. It’s a file setup problem.

Many online shops emphasize small-run printing with 3-5 day turnarounds, but the production process still matters. This print guidance on flip books makes the key point clearly: file preparation from the start is what helps a printer deliver quality, whether you need one copy or one hundred.
Set up the page for flipping, not just viewing
A flip book page isn’t a mini poster. It has a thumb side, a binding side, and a very specific job. Motion has to read near the edge where the flipping happens.
That means you should place the main subject so the critical action stays visible while the pages fan. Keep faces, hands, and props out of trim danger zones. If your sequence includes text, use it sparingly and keep it well inside the safe area.
Useful layout habits:
- Build one master page template: Same image box, same margins, same page position.
- Leave breathing room: Don’t push the character to the very edge.
- Number your frames: Tiny page numbers help if the stack gets shuffled.
- Export a proof strip: Print a rough draft at home before sending the final file.
Use print settings that hold up on paper
Print specs sound boring until they save you. For flip books, they matter because the pages are small and handled a lot.
Use these standards unless your printer says otherwise:
- 300 DPI images: Lower resolution often looks soft in small formats.
- CMYK color mode: RGB files can shift when printed.
- PDF export with embedded images: Don’t send loose assets unless the printer requests them.
- Consistent page size throughout: One mismatched page can throw off trimming and binding.
If you’re creating illustrated frames, especially stylized panels, it helps to study how comic artwork is prepared for print. This article on comic book style artwork for print-minded projects is a good companion read because it reinforces the same discipline around composition, line clarity, and page presentation.
Production note: Small pages magnify mistakes. If an eye is blurry or a hand is clipped, readers will notice immediately.
A simple export checklist
Before you upload your PDF, check these in order:
- All pages are in the correct sequence
- The crop is identical across frames
- No text or important motion sits too close to trim
- Colors look intentional, not oversaturated
- The final PDF opens cleanly and pages are the right size
If possible, print a cheap mockup and bind it with clips or tape. Flip it fast. That test catches pacing and placement issues better than staring at a monitor.
Choosing a Printer and Finalizing Your Order
Once the file is ready, the printer decision shapes the final feel more than is commonly anticipated. Two custom flip books printed from the same PDF can feel completely different depending on stock, finish, trimming accuracy, and binding style.
That’s why I don’t choose printers by homepage aesthetics. I choose them by whether they answer practical questions clearly.
There’s clear demand for tactile, personalized products. In the custom space, bespoke flipbooks sit inside the broader $38 billion custom printing market as of 2025, as referenced in FlippingBook’s statistics-related help content. That doesn’t tell you which printer to pick, but it does explain why there are so many options competing for your order.
What to ask before you buy
Some printers are better for one-off gifts. Others are better for event runs, branded handouts, or classroom packs. Ask direct questions before uploading anything.
Use this checklist:
- Can they trim consistently on small formats? Tiny books reveal sloppy finishing fast.
- Do they provide a printed proof option? Worth it for sentimental or client work.
- What binding style do they use? You want something that flips cleanly without pages sticking.
- Can they advise on paper stock? A stock that’s too thin feels flimsy. Too thick, and the book won’t fan smoothly.
- Do they understand sequence-based products? A shop that mostly prints flyers may not.
Material trade-offs that matter
| Choice | Usually better when | Watch out for |
|---|---|---|
| Matte finish | You want an artful, soft look | Dark images can lose punch |
| Gloss finish | You want bright photos and pop | Reflections can distract |
| Lighter stock | You want easier flipping | Can feel less premium |
| Heavier stock | You want durability | Can resist smooth flipping |
The right answer depends on the project. A wedding favor might benefit from a polished cover and lighter interior pages. A portfolio sample might need a sturdier feel. A kid-focused gift needs durability more than subtle paper texture.
Online printer or local shop
Online services are convenient and often familiar with novelty products. Local print shops can be better when you want to hold paper samples, discuss trimming in person, or correct a proof quickly.
If you’re turning a larger illustrated story into a physical print project, this broader guide to creating and printing your own custom comic book helps with the print-buying mindset. The same logic applies to flip books: clear specs, proofing discipline, and choosing materials based on use, not guesswork.
The best printer isn’t always the cheapest one. It’s the one that makes the motion survive the manufacturing process.
Frequently Asked Questions About Custom Flip Books
How many pages should a custom flip book have?
Enough to make the action readable, but not so many that the motion stalls. For most projects, a shorter, cleaner sequence works better than an overlong one with tiny changes. If the middle feels repetitive during a test flip, cut frames.
Is video, photo, or illustration best?
It depends on the effect you want.
- Video-derived frames feel natural and capture real expression.
- Photo sequences give you more control and are easier to reshoot.
- Illustrated or AI-assisted frames are best when you want stylization, fantasy, or comic-book energy.
If the gift depends on likeness, photos or video usually hold identity better. If the gift depends on imagination, stylized frames are often more memorable.
Can I use text in the flip book?
Yes, but keep it limited. A cover title, a final-page message, or a short reveal line usually works. Dialogue across multiple pages often becomes hard to read during flipping and can distract from the motion.
Do I need to draw well to make one?
No. Strong custom flip books come from good sequencing, not elite drawing skill. Simple shapes, clean silhouettes, and controlled movement beat detailed but inconsistent artwork.
What’s the most common mistake?
Trying to animate too much. Beginners often choose a complicated scene with multiple actions, changing camera angles, or extra characters. The result feels muddy. One subject and one movement is the safer bet.
How do I protect image quality?
Start with the cleanest source material you can get. Keep crops consistent, avoid overediting, and proof the sequence before export. Most quality issues don’t start at the printer. They start when the frames are weak, misaligned, or too low in resolution.
Can custom flip books work as gifts and event favors?
Absolutely. They’re especially good when the moment is short and personal. Reactions, transformations, kisses, waves, and comic reveals all translate well into a format people can hold and replay instantly.
If you want a fast way to create stylized source imagery before turning it into custom flip books, PersonalizedComics is worth a look. It lets you turn photos and story ideas into comic-style pages in multiple art styles, which is a strong starting point for anyone experimenting with manga-inspired, noir, fantasy, or cyberpunk flip book concepts without drawing everything from scratch.