How to Write a Graphic Novel Script in 2026
Before a single panel gets drawn, before any dialogue is written, your graphic novel script needs a solid foundation. This is the blueprint phase, where you define your core story, get to know your characters, and decide on the visual feel of your world.
Think of it as building the skeleton. Get this part right, and the rest of the process has a sturdy structure to hang on.
Developing Your Core Story and Vision
Every great graphic novel starts as a spark—that one cool idea you can't shake. But the real work begins when you shape that idea into a concrete plan. This stage is all about creating a North Star for your project, ensuring every panel, character, and plot twist serves the story you actually want to tell.
First things first, boil your entire story down to a logline. This is your narrative's DNA—a one or two-sentence summary that nails down your main character, their conflict, and what’s at stake. A logline for The Hunger Games could be: "In a dystopian future, a teenage girl volunteers for a televised fight to the death to save her sister, forcing her to choose between survival and her own humanity."
Key Takeaway: A strong logline isn't just a creative exercise. It's your elevator pitch. It forces you to find your story's true focus and proves you have a clear, marketable concept before you invest hundreds of hours into writing.
Defining Your Core Plot Points
With your logline as your guide, it's time to build a full outline. This is where so many writers get tempted to "discover" the story as they go. Don't do it. A graphic novel script is a collaborative document; you can't afford to surprise the artist—or yourself. You need a complete roadmap, including the ending.
A simple three-act framework is all you need to get started:
- Act I: The Setup Introduce your hero, their world, and the inciting incident that yanks them out of their normal life. Establish what's at stake.
- Act II: The Confrontation This is the messy middle. Your character faces rising obstacles, makes bad decisions, and grows (or fails to grow) on their way to the goal.
- Act III: The Resolution The story hits its peak in a final confrontation. The central conflict is resolved, and your themes land with a satisfying thud.
Thinking through these major beats ensures your story has momentum and doesn't just wander aimlessly. If you're staring at a blank page, sometimes the best way to get moving is to look at proven concepts. Check out our guide for some unique ideas for comic strips that can get your creativity flowing.
Crafting Characters Who Drive the Story
Your characters are the engine of your comic. Their wants, fears, and flaws are what push the plot forward. A cool monster or a slick sci-fi world is great, but readers connect with people. It's time to go beyond a simple description and build a full character biography.
For every major character, you absolutely must know:
- Motivation: What do they want more than anything in the world? This is their goal.
- Flaw: What's the internal weakness that keeps getting in their way?
- Backstory: What key events from their past shaped who they are today?
This level of detail makes your characters feel like real, breathing people. It also gives your artist—or an AI tool like PersonalizedComics—rich material to work from when it comes to visual design. A character's internal conflict is often far more dramatic than any external threat you can throw at them.
Choosing the Right Script Format for Your Story
So, you’ve got your story’s foundation—the big idea, the plot twists, and the characters who will bring it all to life. Now comes the architectural part: building the actual script.
One of the first things new comic writers discover is that, unlike screenwriting, there’s no single, universally required format. This isn't about following rigid rules. It's about finding a structure that translates your vision into clear, actionable instructions for your artist—whether that's a human collaborator or an AI tool like PersonalizedComics.
The format you pick will fundamentally shape how you think about pacing, scene construction, and the delicate dance between words and images.

Think of it this way: the elements above are the "what" of your story. Your script format is the "how" you'll bring them to the page.
The Screenplay Format
If you’ve ever dabbled in writing for film or theater, this format will feel like coming home. It’s built on standard screenplay conventions, prioritizing dialogue and action. You’ll use familiar elements like scene headings (INT. COFFEE SHOP – DAY), action lines, and indented dialogue blocks.
This approach is perfect for writers who naturally think in scenes instead of individual panels. It keeps your focus on the story's overall flow and the rhythm of character interactions, leaving a lot of the specific visual interpretation to the artist. Bryan Lee O'Malley, the mastermind behind the Scott Pilgrim series, is a famous proponent of this method.
But be warned: the page count can be deceptive. Victoria Ying, the illustrator of City of Secrets, shared on her professional blog that her 80-page screenplay ballooned into a 252-page graphic novel. That’s a 215% increase. Why? Because comics can stretch out a single moment across multiple panels, digging into a reaction or a quiet beat that would only last a second on film.
The Full Comic Script Format
This is the workhorse of the comics industry and arguably the most common format for writers working with an artist. Often called a "panel-by-panel" script, this method gives you meticulous control over the reader’s experience.
You write the script page by page, and then break down each page panel by panel.
- Page 1
- Panel 1: Describe the visual—the camera angle, what the character is doing, the setting.
- CAPTION: Add any narrative text boxes here.
- CHARACTER: Write the dialogue for the character.
- Panel 2: Repeat the process.
This format leaves almost nothing to chance. You dictate the number of panels, the action in each, and precisely where dialogue lands. It ensures your big reveals hit on a page turn and that the pacing feels exactly as you intended. It forces you to think like a director, but it’s the absolute clearest way to communicate your vision.
Pro Tip: When writing a full comic script, try to keep dialogue under 25 words per speech balloon. Any more than that, and the text starts to suffocate the art, making the page feel cluttered and slow.
The Thumbnail Script
If you’re a writer who also has a knack for visual art, the thumbnail script is a game-changer. Instead of just describing the panels with words, you draw them.
These aren't meant to be polished illustrations. They’re tiny, rough sketches—or "thumbnails"—that map out page layouts, character placement, and the flow of action. You can scribble dialogue and captions next to each thumbnail.
This method is incredibly intuitive for visual thinkers because you’re solving storytelling problems with images right from the start. It’s a fantastic way to experiment with panel arrangements and make sure your visual pacing works before a single line of final art is drawn.
Ultimately, there is no "wrong" choice here. The best format is the one that feels most natural to you and removes friction from your creative process. If you write dialogue in your sleep, the screenplay format is a great fit. If you need absolute control over every beat, the full comic script is your ally. And if you think in pictures, start sketching thumbnails.
Writing for a Visual Medium
If you're coming from prose writing, the first thing you need to do is unlearn a few habits. In a novel, you can spend pages exploring a character's internal monologue. In a comic, you have to show those thoughts through a clenched jaw, a nervous glance, or a single, perfect teardrop.
This is the art of writing for a visual medium. It’s a unique blend of literary economy and cinematic direction. Your job is to give your artist clear, evocative instructions—not to micromanage every pencil stroke, but to give them the essential information they need to bring the story to life. You’re the director, not the cinematographer.
From Telling to Showing
The biggest mental shift is moving from telling the reader what’s happening to showing them. That old writing advice, “show, don’t tell,” isn't just a guideline in comics; it’s the fundamental law.
If an action, a camera angle, or an expression can convey the meaning, it’s almost always better than a block of text. This table breaks down how to translate prose-style narration into the visual language of a graphic novel script.
Prose vs Graphic Novel Scripting What to Show vs Tell
| Narrative Element | Prose Novel Approach | Graphic Novel Script Approach |
|---|---|---|
| Character Emotion | Internal monologue or descriptive narration. “She was heartbroken by his words.” | Focus on visual cues. PANEL: CLOSE UP on ANNA’s face. A single tear rolls down her cheek. |
| Setting the Scene | Detailed descriptions of the environment, smells, and sounds. | Key visual elements to establish place. PANEL: WIDE SHOT. A grimy, neon-lit alley. Rain slicks the pavement. |
| Pacing an Action | Sentences are shortened or lengthened to control reader speed. | Panel count and size. Rapid-fire, small panels for a quick fight; a full-page splash for a huge explosion. |
| Revealing Information | Narration or dialogue explains a new plot point to the reader. | Visual discovery. PANEL: CLOSE UP on a photograph on the desk, revealing a hidden connection. |
The goal is to provide a visual blueprint. Instead of writing, "John’s anger boiled over. He felt betrayed," you translate that feeling into concrete actions for the artist.
Think about it this way:
- PANEL 1: CLOSE UP on JOHN’s face, his eyes wide with shock. His mouth is slightly agape.
- PANEL 2: John's hands clench into tight fists on the tabletop.
- PANEL 3: WIDE SHOT of the room. John stands up abruptly, his chair scraping loudly against the floor.
Suddenly, we feel his anger through action, not just words. The artist has a clear shot list, and the reader experiences the emotion right alongside the character.
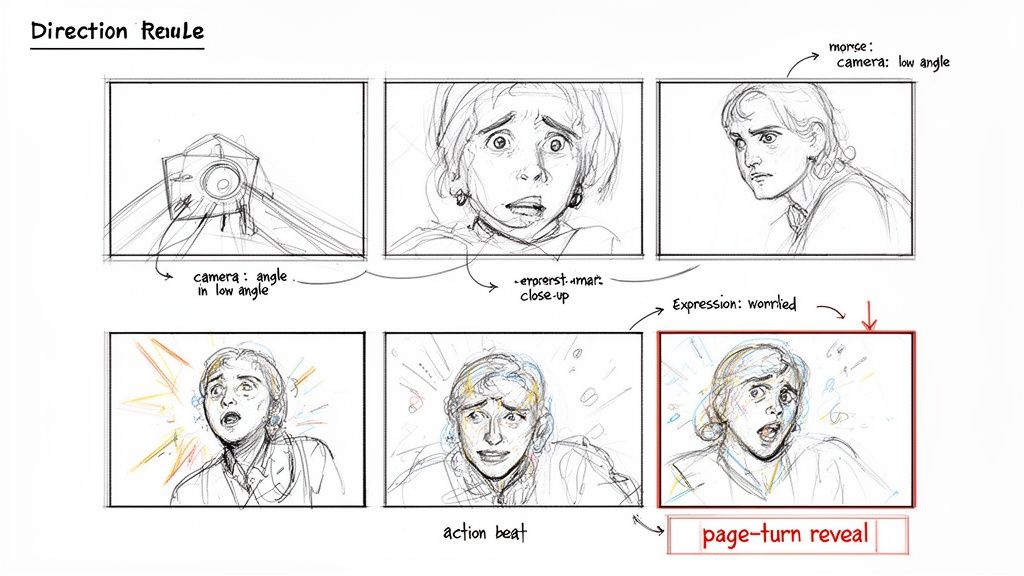
The Art of the Panel Description
Panel descriptions are the heart of your script. They need to be concise yet rich with just enough detail to guide the artist on the most critical elements of the scene.
A good panel description usually nails these four things:
- Camera Angle/Shot Type: Is it a WIDE SHOT showing the whole city, or an EXTREME CLOSE UP on a key?
- Characters and Action: What is the character doing in this specific moment? Focus on one key action per panel.
- Setting Details: What background elements are absolutely essential to establish the location or mood?
- Character Expression: What emotion is on their face? This is your secret weapon for conveying subtext.
A writer should think of a graphic novel much in the same way you would script a silent movie, such that the story could still be understood even if all the word balloons and captions were to fall off. The visuals must do the heavy lifting.
This approach guarantees that your story moves forward even without dialogue. For anyone new to this format, experimenting with a custom comic book maker is a fantastic way to see how script descriptions translate directly into visual panels.
Mastering the Page Turn
One of the most powerful tools unique to the comic book format is the page turn. It's your built-in moment for a big reveal, a shocking cliffhanger, or a sudden shift in tone. A reader can't see what's on the next page, which creates incredible natural suspense.
You should always structure your script with this in mind. The last panel on a right-side page (an odd-numbered page) is your launchpad. Use it to build tension just before a huge reveal lands on the very next page.
It’s the comic book equivalent of a dramatic musical sting in a film, and as the writer, it’s entirely within your control. A shocking monster reveal, a long-awaited kiss, or a sudden betrayal has far more impact when it greets the reader as a surprise on a new page.
Mastering Dialogue and Pacing
In a graphic novel, every word pays rent. Space is precious, and the artwork needs room to breathe. This is where you learn to become a ruthless editor of your own work—because too many words can suffocate a panel, but too few can leave your story feeling hollow.
The goal is to make every line count. Does it reveal character? Does it move the plot forward? If a line of dialogue isn't doing real work, it has to go. This economy of language is what separates a good comic script from a great one.
The Art of Saying More with Less
Prose writers have a nearly infinite canvas for words. We don't. The constraints are the entire game.
Just look at the numbers. Acclaimed creator Molly Ostertag has shared that her full-length graphic novel scripts often land between 10,000 and 15,000 words—for a 200-250 page book. That’s a shockingly small number compared to a traditional novel. She developed this instinct by studying her favorite comics to see how much story could truly fit on a single page. It's a practice you should absolutely steal. You can even explore her full writing process in more detail.
To get that lean, you have to trust your artist and the power of the visuals. Let a pained expression do the work of a whole sentence. Let a character’s posture speak louder than their words.
Here are a few rules of thumb for tightening your dialogue:
- The 25-Word Rule: As a guideline, try to keep any single speech balloon under 25 words. This is a fantastic discipline for preventing text from overwhelming the art.
- Kill Redundant Lines: If the art shows a character fuming with clenched fists and a red face, you don't need them to say, "I'm so angry!" The art is already screaming it. The dialogue is just noise.
- Subtext Is Your Best Friend: What a character doesn't say is often far more powerful than what they do. A tense pause, an evasive answer, or a sudden change of subject can build more tension than a long, dramatic speech ever could.
Directing the Reader's Eye with Pacing
Pacing in comics isn't just about how fast the plot moves. It's a literal, physical control you have over the reader's experience, and it's almost entirely dictated by the panel layout on the page.
You're the director, and the page is your camera. The number, size, and shape of your panels are what control the story's rhythm.
Key Insight: Pacing is visual. A page crowded with small panels feels fast, chaotic, and urgent. A page dominated by a single, large image feels slow, quiet, and monumental. You control the speed at which the reader takes everything in.
Think about how you can manipulate time and emotion through your panel choices.
Scenario 1: A Fast-Paced Fight Scene
Imagine your hero is in a desperate brawl. To convey that speed and chaos, your script would call for a page packed with small, tight panels.
- PAGE 12 (7 panels)
- PANEL 1: CLOSE UP on a fist connecting with a jaw. SFX: CRACK!
- PANEL 2: A quick shot of the hero ducking a wild swing.
- PANEL 3: The hero's foot sweeps the opponent's legs out from under them.
- PANEL 4-7: A rapid-fire sequence of blocks, strikes, and pained reactions. No dialogue needed.
The reader’s eye will jump from one panel to the next, mimicking the frantic, breathless energy of the fight itself.
Scenario 2: A Breathtaking Reveal
Now, picture your hero finally reaching the dragon's lair after a long journey. You want the reader to feel the same sense of overwhelming awe.
- PAGE 13 (Full-Page Splash)
- PANEL 1: A MASSIVE, full-page image. The dragon slumbers on a mountain of glittering gold. Our hero is just a tiny silhouette in the foreground, staring up in absolute wonder.
This single panel forces the reader to stop. They have to pause, linger on the image, absorb the details, and feel the sheer weight of the moment. You’ve successfully slowed down time to give a critical story beat the impact it deserves.
When you master this interplay between dialogue and paneling, you stop just writing a story—you start crafting a true visual experience.
Alright, you've done the hard work. The script is finished—every page, panel, and piece of dialogue is mapped out. Now for the fun part: seeing your story come to life. This is where you get to turn all those words into a visual proof-of-concept you can actually share.
You don't need to be an artist to make this happen. With a tool like PersonalizedComics, the process is built for writers, letting you transform your script into professionally illustrated pages in minutes. Think of it as turning your blueprint into a working prototype, perfect for spotting what works or showing your vision to collaborators.
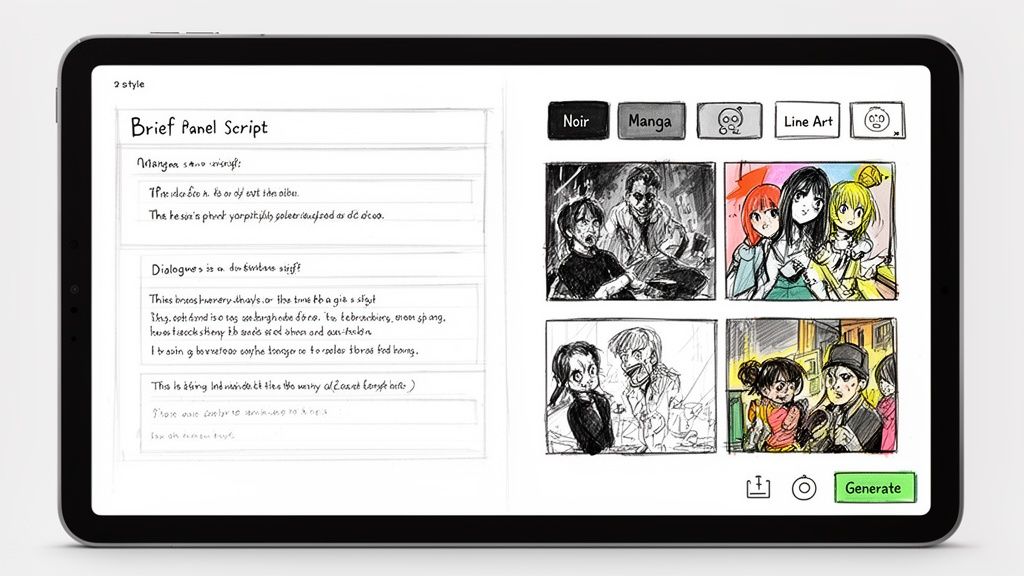
Feeding Your Script to the AI
The first step is pretty straightforward: you're going to break down your script, page by page, and feed the essential parts into the AI generator. It's all about translating your script format into the platform's inputs. You'll focus on three main things:
- Panel Descriptions: This is where you copy and paste your descriptions for each panel. This is your direction to the AI—tell it about the characters, the action, the setting, and even the camera angle you imagined.
- Dialogue: Drop in the lines for each character. The AI takes care of formatting them into proper word balloons.
- Narration/Captions: Any narrator text goes here. It’ll show up in the classic caption boxes.
This one-to-one process ensures the comic page mirrors the structure you already built in your script. You’re basically directing an AI artist, but you get to see the results in minutes instead of months.
Writing Prompts That Actually Work
Here’s the thing: the quality of your art comes down to the quality of your descriptions, or prompts. A lazy prompt gets you a lazy, generic image. But a specific, evocative prompt? That’s how you get art that feels like it was pulled directly from your head.
For instance, don't just say: “A man stands in a futuristic city.”
Get specific. Give the AI something to work with: “A grizzled detective in a long trench coat stands on a rain-slicked street. Towering neon skyscrapers loom in the background, casting long shadows. Cyberpunk aesthetic, moody lighting.” See the difference?
You can also upload reference photos to create character models. If your story is a gift for a friend or family member, just upload their picture, and the AI will adapt their likeness into your chosen art style. It’s a fantastic way to keep your characters looking consistent from the first panel to the last. For a deeper dive, check out our complete create your own comic book kit for more pointers.
Pro Tip: Your choice of art style is a huge part of the storytelling. A gritty crime noir needs those high-contrast shadows from the 'Noir' style. A sci-fi adventure might look perfect in 'Cyberpunk,' while a deeply personal story could benefit from the soft, expressive feel of the 'Watercolor' look. Choose the style that amplifies your story's tone.
The Modern Marvel Method
What’s fascinating is that this AI-driven workflow is a strange echo of the classic "Marvel Method." Back in the 1960s, Stan Lee was churning out an insane number of stories—over 50 a month at his peak. To manage it, he’d often give legendary artists like Jack Kirby just a short plot synopsis for an entire issue instead of a full, panel-by-panel script. The artist would draw the whole story from that outline, and Lee would come in after and write the dialogue.
Today’s tools let you play with a similar workflow. You can bring in a detailed, 10,000-word script, or you can go full Stan Lee and generate pages quickly from a simple plot outline. PersonalizedComics uses a credit system (1 credit = 1 page) and the credits never expire, so it's easy to prototype an entire book. You can even try this classic method for free with the four free credits you get when you sign up. If you're curious about how scripting has changed over the years, you can discover fascinating insights about classic comic script formats.
Answering Your Biggest Scriptwriting Questions
When you first start writing a script for a graphic novel, a handful of questions always seem to come up. It's a unique format, and it's easy to get tangled up in the "rules." But don't worry, the answers are usually simpler than you think.
Let's clear up some of the most common stumbling blocks so you can get back to what matters: telling your story.
How Long Should a Graphic Novel Script Be?
This one surprises a lot of people. A finished graphic novel might be a massive 200-250 pages, but the script that drives it is lean. For a book that size, you're probably looking at a word count between 10,000 and 15,000 words.
Why so short? A comic script is a blueprint, not a novel. You're not there to describe the texture of the drapes; you’re there to provide the essential dialogue and action. You give the artist the "what," and they provide the "how" with their visual storytelling.
Writer's Tip: Try to stick to a one-to-one page rule. One page of your script should roughly equal one finished page of comic art. It’s a simple guideline that helps you, the artist, and the editor manage the story's structure and pace.
What Is the Biggest Mistake New Writers Make?
Without a doubt, it’s overwriting. New comic writers, especially those coming from prose, have an urge to fill the page with words. In comics, that's a killer. Less is almost always more.
This problem usually shows up in three ways:
- Bloated Dialogue: Characters launch into long monologues that clog up the artwork. Keep your speech balloons tight. A good rule of thumb is to stay under 25 words per balloon.
- Micromanaging Panels: Scripts that describe every shadow, background character, and piece of furniture. Your job is to describe the key action and emotional beat of the panel, not to handcuff the artist's creativity.
- Leaning on Narration: Using caption boxes as a crutch to tell the reader what’s happening. Comics are a visual medium. The golden rule is absolute here: show, don't tell.
If a character’s slumped shoulders or a single tear can do the work, it's a thousand times more effective than a caption box explaining their sadness.
Do I Need to Be an Artist to Write a Graphic Novel?
Absolutely not. This is one of the biggest myths out there. Think of it like a film: the director and the cinematographer have two different, highly specialized jobs. The same is true for a comic's writer and artist.
Your role is to build the world, dream up the characters, and lay down the story's architectural plan. The artist’s role is to bring that plan to life with their visual expertise. It's a partnership.
And now, technology is closing that gap even more. Tools like PersonalizedComics let writers generate high-quality comic pages directly from their scripts using AI. Your most important skill isn't drawing—it's storytelling.
How Do I Control Pacing in My Script?
Pacing is your secret weapon, and you control it mainly through panel count and panel size. This is how you manipulate the reader's sense of time on the page.
A frantic, chaotic fight scene might get broken down into 6 to 9 small, tight panels, forcing the reader's eye to jump from one moment to the next. It feels fast and claustrophobic.
On the other hand, a huge, dramatic reveal—a character finally seeing a lost city, for example—might deserve a full-page splash page. This forces the reader to pause, take a breath, and soak in the scale and emotional weight of the moment. You specify these layouts directly in your script, giving you precise control over the story’s rhythm.
Ready to see your script come to life? With PersonalizedComics, you can turn your finished words into a visual masterpiece, no drawing skills needed. Just import your script, select a professional art style, and let AI generate polished comic pages in minutes. Start prototyping your graphic novel today at https://personalizedcomics.com.